Getting Started on CoreML by Three Steps
Core ML
This tutorial is based on Core ML which can be only running on iOS 11.Core ML allows you to integrate machine learning models into your app.
I’ll show you Three Steps on getting started on CoreML basic use.
Overview
With Core ML, you can integrate trained machine learning models into your app. As shown below.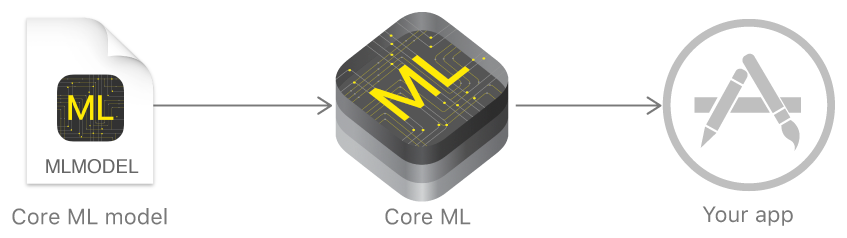
So what is Trained Model?
In fact, a Trained Model is the result of applying a machine learning algorithm to a set of training data. The model makes predictions based on new input data. For example, a model that’s been trained on a region’s historical house prices may be able to predict a house’s price when given the number of bedrooms and bathrooms.
Core ML is the foundation for domain-specific frameworks and funcitonality. Core ML supports Vision for image analysis, Foundation for natural language processing (for example, the NSLinguisticTagger class), and GameplayKit for evaluating learned decision trees. Core ML itself builds on top of low-level primitives like Accelerate and BNNS, as well as Metal Performance Shaders.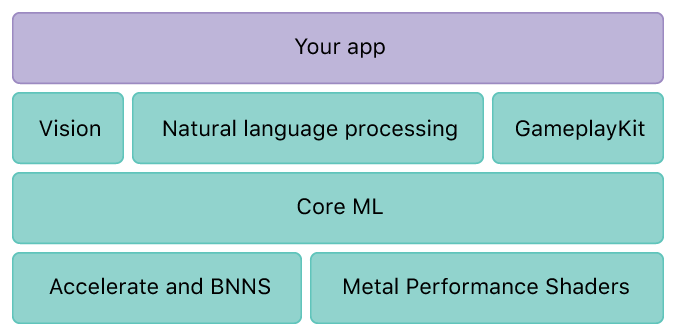
Core ML is optimized for on-device performance, which minimizes memory footprint and power consumption. Running strictly on the device ensures the privacy of user data and guarantees that your app remains functional and responsive when a network connection is unavailable.
Go Ahead!
This example is showing your How to predict houses’ price?
Step 1
First, you need to download this project . This is an official demo, if you can understand this project demo, just ignore my anatomy and next steps.
Step 2
Second, creating a Xcode project -> choosing Swift language -> dragging the file MarsHabitatPricer.mlmodel into your project. MarsHabitatPricer.mlmodel file located in official demo.
Step 3
Finally, There is a snnippet code in ViewController.swift file as shown below:1
2
3
4
5
6
7
8
9
10
11
12
13
14
15
16
17
18
19
20//1.Initialized an instance of MarsHabitatPricer
let model = MarsHabitatPricer()
override func touchesBegan(_ touches: Set<UITouch>, with event: UIEvent?) {
//2.Given the input data
let solarPanels: Double = 2.0 //Range from 1.0 to 5.0
let greenHouses: Double = 3 //Range from 1 to 5
let acres: Double = 1500 //Range from 750 to 10,000
//3.Predict a price according by solarPanels, greenHouses and acres
guard let priceOutput = try? model.prediction(solarPanels: solarPanels, greenhouses: greenHouses, size: acres) else {
fatalError("Getting an unexpected error.")
}
//4.Output the predicted price
let outputPrice = priceOutput.price
print("house price prediction is \(outputPrice)")
}
then, building and running your Core ML app and you’ll see there is a result outputed in Console1
house price prediction is 7264.0491831318
which means you get the house price according by your input data(solarPanels, greenHouses and acres)
References
Core ML Documentation
Integrating a Core ML Model into your App
======================================================================================================
Core ML
这个简单的教程是基于Core ML,Core ML只能运行在iOS 11。Core ML允许你集成机器学习训练模型到你的iOS应用。
我将要通过三步曲来为你展示一下Core ML基本的使用。
概述
通过Core ML,你可以把机器学习训练的模型集成到你的iOS应用上,如下图所示:
所以,什么是训练的模型(Trained Model)?
事实上,一个训练的模型(Trained Model)就是一个应用机器学习算法到一组训练数据的集合的结果。这个模型可以通过新提供的数据进行预测。 例如,一个模型在一个区域的历史房价上被训练了,那么这个模型可以通过给定的房间数和洗手间数来预测房价。
Core ML是一个特定领域框架(domain-specific)和功能性的基础。Core ML支持视觉的图像分析,自然语言处理的基础(例如,NSLinguisticTagger类),还有GameplayKit用于评估学习决策树(Decision Trees)。Core ML本身是建立在低层的原语(low-level primitives)之上,就像Accelerate和BNNS,还有Metal Performance Shaders。
Core ML是在设备内部做的优化,这种优化可以大大的减小内存占用(Memory Footprint)和性能消耗(Power Consumption)。
当你的设备网络不可用时,并且在你的设备上运行Core ML,它严格的确保了用户数据的隐私性,也保证了设备上的应用的基本操作和响应性。
开始吧!
这个例子是告诉你如何测试房价?
步骤一
首先, 你需要下载此项目 。这是一个官方的例子,如果你可以理解这个项目,那你就忽略下面两步吧。
步骤二
然后, 创建一个项目 -> 选择Swift语言 -> 拖拽MarsHabitatPricer.mlmodel文件到你的项目, 这个MarsHabitatPricer.mlmodel文件在第一步下载的Demo目录里.
步骤三
最后,在ViewController.swift文件里,插入如下代码:1
2
3
4
5
6
7
8
9
10
11
12
13
14
15
16
17
18
19
20//1.初始化一个MarsHabitatPricer的实例
let model = MarsHabitatPricer()
override func touchesBegan(_ touches: Set<UITouch>, with event: UIEvent?) {
//2.给定输入数据
let solarPanels: Double = 2.0 //Range from 1.0 to 5.0
let greenHouses: Double = 3 //Range from 1 to 5
let acres: Double = 1500 //Range from 750 to 10,000
//3.根据solarPanels、greenHouses和acres来预测房价
guard let priceOutput = try? model.prediction(solarPanels: solarPanels, greenhouses: greenHouses, size: acres) else {
fatalError("捕获到未知的错误。")
}
//4.输出预测的房价
let outputPrice = priceOutput.price
print("房价预测的结果为: \(outputPrice)")
}
通过cmd + r 或者Xcode导航栏左上角的启动按钮,启动你的Xcode项目,在控制台你就能看到输出的结果了1
房价预测的结果为: 7264.0491831318
这个结果的意思是,通过提供的solarPanels、greenHouses和acres输入数据预测出了房价